Four days are left for you to get your free shelf to celebrate TTG Bunker's 1st birthday. All you have to do is comment on this blog post before the end of the month! I'd say that this is the perhaps the easiest contest on the internet and I'm giving away some really nice stuff. The only way to win is to comment people!
Go post a comment already!
What are you waiting for?
You know you want to!

Monday, September 26, 2011
Tuesday, September 6, 2011
TTG Bunker's 1st Birthday
Hey folks,
The blog is coming up on its one year birthday on September 8th and how better than to celebrate by giving away stuff!

So, nothing to it, except:
(A) You MUST be a follower
(B) You must comment on this post (something PG-13, for instance "Happy Birthday TTG!")
(C) You must win the Random.com drawing
(D) If you are not in the CONUS and you win a shelf, shipping will be on you. Sorry about this, but it costs a lot to ship these out of the USA (between 35-60 USD) and I do not have any sponsors to help adjust the costs. But if you want a shelf, this is a great time to get one for just the cost of shipping.
There are three (3) prize levels which are the following:
(1) Choice of Hobby Shelf OR Dropper Bottle Shelf
(2) Random bag of hobby supplies and $15.00 Store Credit.
(3) $15.00 Store Credit
Again, all of the prizes are sponsored by ME, the hobbyist for YOU, the bloglings. The drawing is completely random within the above stated guidelines. TTG Bunker appreciates your support, and thanks you for a very good first year. I will do my best to keep content coming along with many of the planned tutorials that are already recorded. Youtube will be a big part of the next year of the site, so stay tuned for more video tutorials and just plain wargaming fun.
Also a big thanks to Awesomepaintjob.com and Scalemodeladdict.com for your support to the site.
The blog is coming up on its one year birthday on September 8th and how better than to celebrate by giving away stuff!

So, nothing to it, except:
(A) You MUST be a follower
(B) You must comment on this post (something PG-13, for instance "Happy Birthday TTG!")
(C) You must win the Random.com drawing
(D) If you are not in the CONUS and you win a shelf, shipping will be on you. Sorry about this, but it costs a lot to ship these out of the USA (between 35-60 USD) and I do not have any sponsors to help adjust the costs. But if you want a shelf, this is a great time to get one for just the cost of shipping.
There are three (3) prize levels which are the following:
(1) Choice of Hobby Shelf OR Dropper Bottle Shelf
(2) Random bag of hobby supplies and $15.00 Store Credit.
(3) $15.00 Store Credit
Again, all of the prizes are sponsored by ME, the hobbyist for YOU, the bloglings. The drawing is completely random within the above stated guidelines. TTG Bunker appreciates your support, and thanks you for a very good first year. I will do my best to keep content coming along with many of the planned tutorials that are already recorded. Youtube will be a big part of the next year of the site, so stay tuned for more video tutorials and just plain wargaming fun.
As a BONUS, if the site reaches 100 subs by the end of September, I'll give away TWO (2) shelves. Tell your friends to up your chances of winning the popular hobby painting shelves.
Also a big thanks to Awesomepaintjob.com and Scalemodeladdict.com for your support to the site.
Monday, August 8, 2011
TerraiNation Shrine of The Aquila Final Pics

TTG Bunker is back at it, finishing up the terrain for our FLGS. I got to play test this beauty before I dropped it off at the Cottman Ave store in Philadelphia, PA, and let me tell you, the rules that we created for it were a ton of fun. I'm quite satisfied with the way that it turned out, and I made the deadline, so not too shabby! If you'd like to play on this terrain and you live in the Philadelphia area, just stop by the Games Workshop store and enjoy yourself. Tell em TTG Bunker sent ya!

Since the wrap up of this BIG project, I am left with another vacancy. If anyone should be interested in a terrain commission, please send me an email at: james_swallow@yahoo.com
Your support is much appreciated as always! Until next time, CHEERS!

Friday, July 29, 2011
TerraiNation Play Testing
So, before I lock all of the final details in, I generally like to do a small play test to make sure that the models will sit well on the different levels of debris or flat areas. Nothing makes me angrier than playing on terrain that wont hold my models up, and I have to lay them down on the board. I figured that while I was setting it all up, I'd do a photo update. Please let me know what you think! Enjoy.


Monday, July 25, 2011
TerraiNation Update
Well, here's the first few coats of paint getting started. Still a TON of work to do here, but you'll get the basic idea. Let me know what you all think!


Monday, July 11, 2011
TerraiNation VI
Hey folks, some eye candy for you. I have been laboring over some FLGS terrain and here's what I've come up with so far. Let me know what you think! For some reason the WIP photos of terrain builds do the actual creation no justice. Leave some feedback!


Monday, July 4, 2011
$15 Off Hobby Shelves Happy 4th of July!
From now til the end of the week (7/10) I am selling Hobby Shelves for $15.00 off the $95.00 retail price. Get them while you can!


Thursday, June 23, 2011
On The Desk
Hey everybody, here's a quick photo progression of what I'm working on currently.
First up, an Iron warriors Rhino, which will have the sergeant standing in the side door trying to get his troops to embark. The Rhino will be wearing Forgeworld doors and extra armor, along with a Chaos cockpit panel.


 Next, a tricked out Iron Warriors attack bike. It needs no explanation....

First up, an Iron warriors Rhino, which will have the sergeant standing in the side door trying to get his troops to embark. The Rhino will be wearing Forgeworld doors and extra armor, along with a Chaos cockpit panel.


Monday, June 20, 2011
Resin Casting Tutorial Video
Hey folks, finally edited and posted on YouTube is my resin casting video which is a followup on the silicone mold making video. This video demonstrates how I cast standard block molds for my terrain projects.
Still up to come are more complex molds and roto casting. I plan on keeping a comprehensive library of resin casting tutorials here on the blog as a reference to all of your casting projects.
Any questions, post them in the comments section.
Thanks for watching!
Still up to come are more complex molds and roto casting. I plan on keeping a comprehensive library of resin casting tutorials here on the blog as a reference to all of your casting projects.
Any questions, post them in the comments section.
Thanks for watching!
Monday, June 13, 2011
Commission Terrain Slots Open, News, Podcast?

Hi everyone, aside from building dozens of shelves for the store, I have also been tying up all of my current terrain commissions, which means, I'm available for your table top terrain project. Check out the blog for a few bits of some of my finished work and also my in progress stuff to see if there is anything you like. I only take on a couple of projects every few months, so now's your chance to get in. Terrain is generally a slow and methodical pace, but if you have a concept drawing, things go much smoother. Shipping on large items is usually a big surprise at the end too, so please be aware that the bigger it is, the more expensive it is to ship.
Drop me an email at james_swallow@yahoo.com to get going on this.
Also, I have the next vid in the casting sequence almost ready for publishing. Stay tuned for my take on mixing and pouring resin, continued from the silicone mold making video.
I recently changed my video gear over to a Nikon D5100, so the youtube format will begin to get better. I had some of my followers commenting that the videos and the pictures never looked the same, so I upgraded my video capability. Also, I picked up a Matrox MXO2 for real time encoding and life is much better, so my output can (hopefully) increase to a few videos per month.
Lastly, I have podcasting capabilities built into my studio already, and I have been scheming up some content to perhaps give it a go. My only question to my followers is, "Does miniature war-gaming/modelling really need another podcast?" Let me know if there is any interest out there, and if there is, what would YOU as a listener want to hear my gaming group talk about?
Well, that's enough rambling, I know you all come here for pictures and videos, and they will be coming shortly.
Thank you all very much for you continued support!
Wednesday, May 25, 2011
And The Winner IS???

David Erickson!!! Congratulations!!! Please send an email to james_swallow@yahoo.com with your contact information and I will mail you your new Hobby Paint Shelf!
For everyone else, STAY TUNED!
Results can be verified at: http://www.random.org/draws/details/?draw=6244
I used a self written code to compile entrants with the user format as follows: James Swallow (GFC) where James Swallow is the name given your google friends contact, and (GFC) is added to the end should you be inclined to check the results.
Thanks again for your continued support of this project, and I look forward to giving away more stuff in the future! You are all truly making this site worth updating regularly. Your continued support is much appreciated!
Hobby Shelf GIVEAWAY!
Well, the blog is rapidly approaching 50 subscribers, and in recognition of this, I'd like to give away one of my Hobby Shelves to one lucky subscriber.
In order to win, TTGBunker.blogspot.com must first reach 50 subscribers, so tell your friends.
After reaching this milestone, a random.org drawing including the first fifty subscribers, will be conducted, and the winner will receive notice via another blog post. In order to receive the merchandise, the subscriber should provide me with a valid address, and I will take care of the rest!
This drawing is a huge THANK YOU to all of my fans and subscribers. After all, it is YOU who keep me going.
Saturday, May 14, 2011
How to Make a Silicone Mold
Hey everyone, check out my latest video tutorial on silicone mold making. This is just a rundown of how I do it, should you have comments or questions, as always, post away!
Thursday, May 12, 2011
Casting a stone tower.
So, here is a progress update on the terrain segment I am working on for the Big Spring Contest. I made a mold of the bottom two layers of bricks and then began mass producing them to expedite the build. After staring at the octagonal section for a while, I decided it would look cool with some iron cross gun slits and a few other detail bits, so, I got out the Dremel and went to town. I will be making the tower section a bit taller, but for now, here are some pics of the progress.


Wednesday, May 4, 2011
Progress for the SMA Contest entry
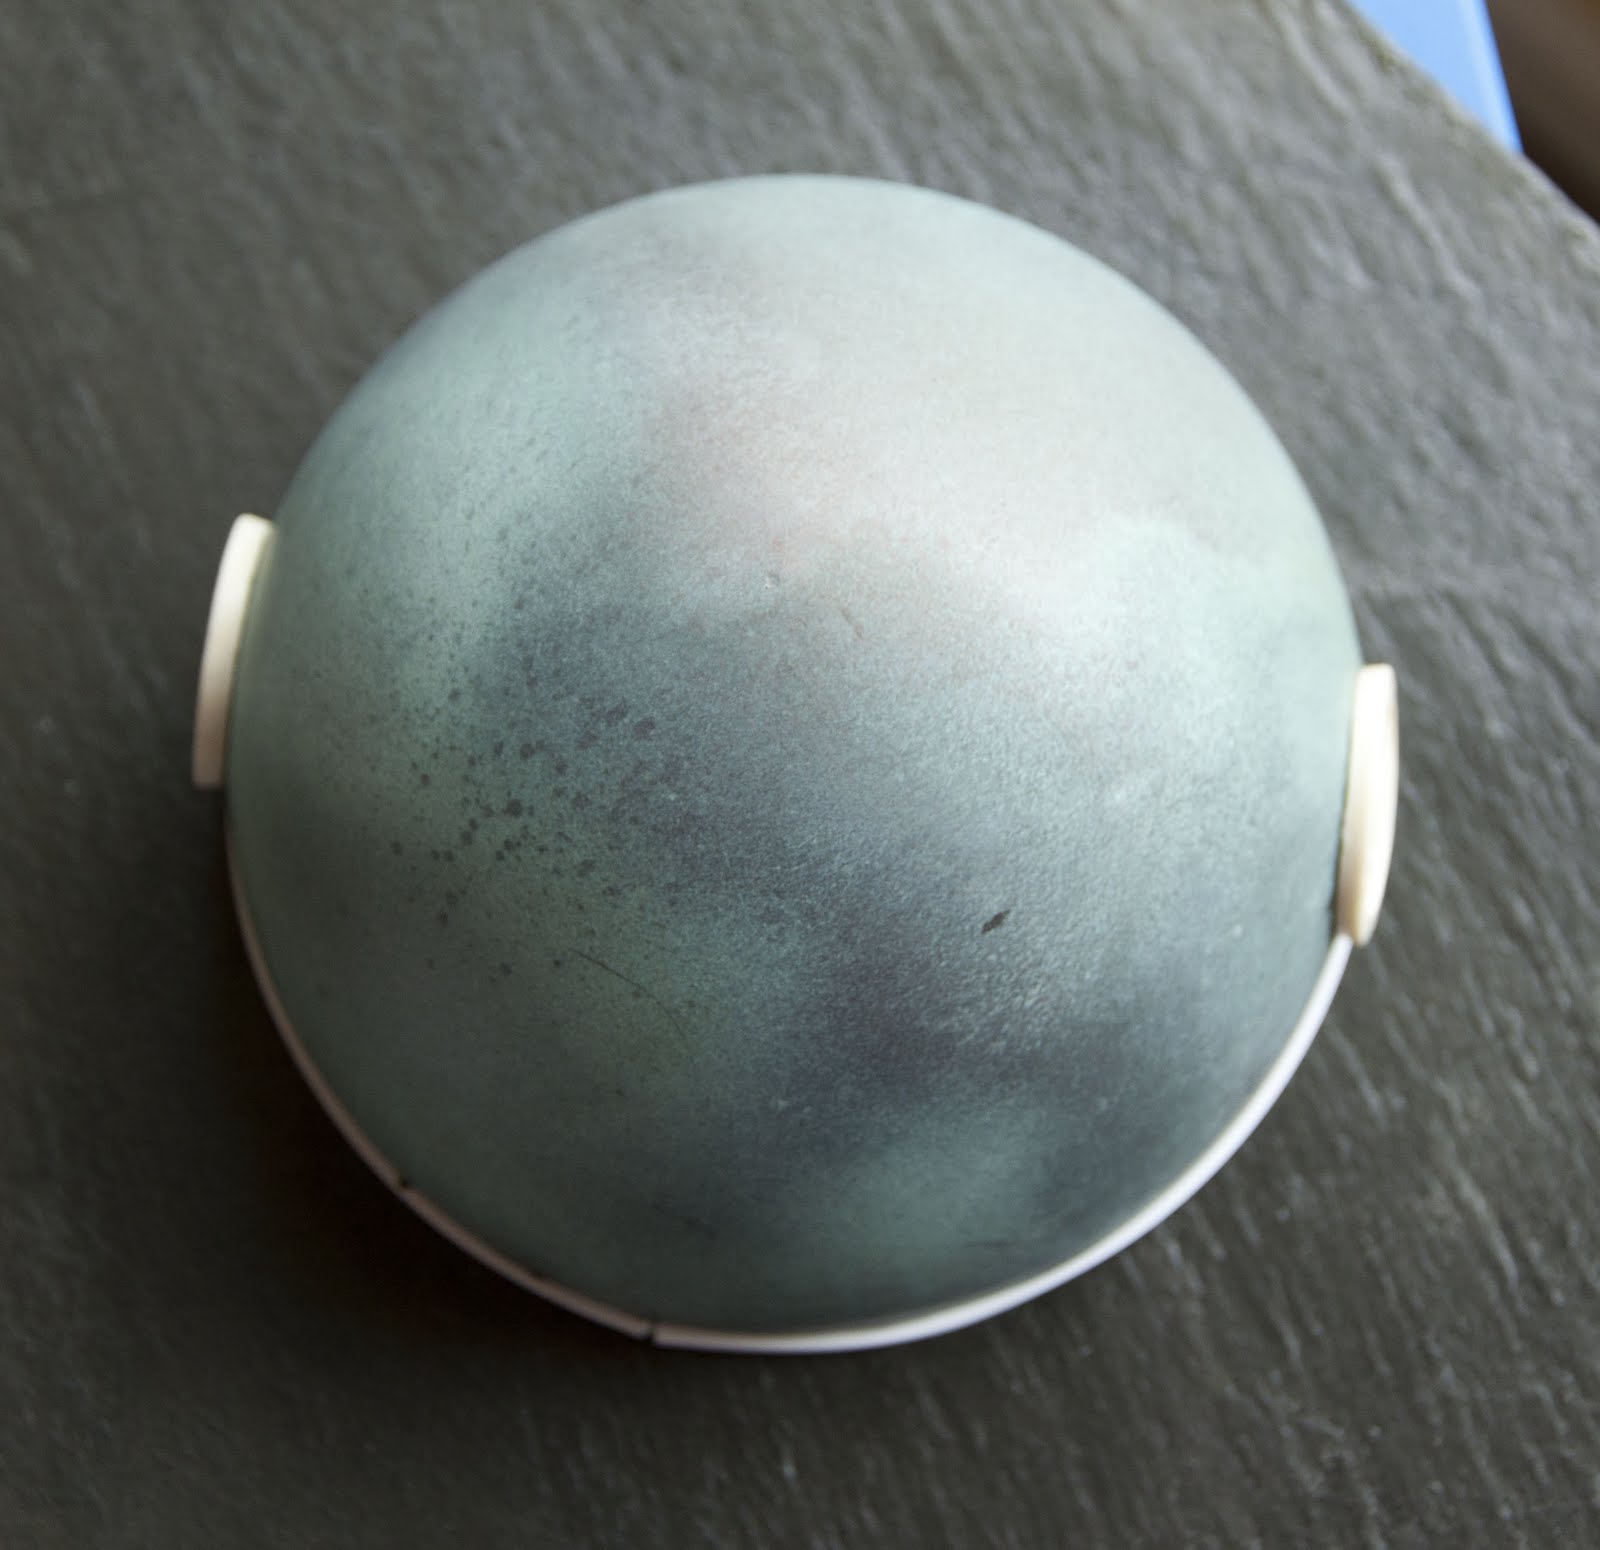
So, I managed to get the patina painted and some quick resin casts banged out and all in all, I'm happy with the progress I have made thus far. The idea is to build a Capitol Building diorama with a sort of "last stand" theme to it.
The dome happens to be one of the hardest terrain features that I have tackled to date, just because there is no good way to add one to any of the existing structures out there. So in a TTG Bunker fashion, I shall build the structure from a few existing casts from Hirst Arts, and some redesigning a la TTG.
Here are a few of the pics from the work done thus far. You may be able to gather that I will be resting the dome atop the octagonal structure. Well, sort of. Just check out the pics. The last one is basically how I plan on modelling it.
It is worth mentioning that in order to get the resin louvers to fit the dome correctly, I had to quickly de-mold them and shape them while they were still flexible. I also did this with some of the railings which you will see later as the build progresses.


Saturday, April 30, 2011
How To Paint A Patina Finish
Hello all, hope the weekend is going well. Ever wonder how to paint on great patina, rust, or weathering effects on metal? Well, why paint it when you can actually get the effect with real metals and patina? I just finished experimenting with some great products from a company called Sculpt Nouveau and I decided that I would post some of my trials. The first video you will see is a copper dome that I am building for a diorama that I will be entering in the SMA Big Spring contest The effect turned out VERY nice and with minimal effort. I highly recommend at least trying these products once, I think you'll love them. ENJOY!
Friday, April 22, 2011
Saturday, April 16, 2011
Detailing Terrain With Mosaic Tiles
Hi everyone,
I just wanted to post a few quick pics of one of my recent terrain flooring projects. I stumbled upon some of these mosaic tiles at Michaels and I figured that I'd give it a shot, and it turned out very well! Have a look for yourself:

 Of course, once the debris is added and the building is painted, I can see this looking very nice! Let me know what you think!
I just wanted to post a few quick pics of one of my recent terrain flooring projects. I stumbled upon some of these mosaic tiles at Michaels and I figured that I'd give it a shot, and it turned out very well! Have a look for yourself:


Friday, April 15, 2011
Model Paint Storage Shelf Giveaway
Well folks, I am proud to announce that we are giving away a shelving unit for the Scale Model Addict Big Spring Contest. To win one of these cool shelves, all you have to do is register for the contest and complete a mini by the required date. The staff at SMA will be picking the winner at random.
Good Luck!
Big thanks for the interest in the shelves thus far! All orders have been filled and are in route. Orders from this point forward are subject to UP TO a 3 week lead time. A lot of work goes into manufacturing these things, so your patience will be greatly apreciated!
ENTER TO WIN!

Good Luck!
Big thanks for the interest in the shelves thus far! All orders have been filled and are in route. Orders from this point forward are subject to UP TO a 3 week lead time. A lot of work goes into manufacturing these things, so your patience will be greatly apreciated!
ENTER TO WIN!
Monday, April 11, 2011
Sunday, April 10, 2011
Vallejo Reaper Acrylic Paint Shelf
Next up: Stores 270 Vallejo or Reaper Dropper Bottle Paints.

All Shelves: 3-4 Week Lead Time. Price $95.00 plus 18.00 insured shipping. I will combine shipping if applicable for an additional 6.00 per shelf.

All Shelves: 3-4 Week Lead Time. Price $95.00 plus 18.00 insured shipping. I will combine shipping if applicable for an additional 6.00 per shelf.
My 2011 SMA Big Spring Contest Entries


Enjoy the rest of the weekend!
Wednesday, April 6, 2011
Acrylic Paint Shelf
Hello all, was able to get a picture of the variety of the paints that will fit in the shelf. Some people had asked if specific paints would fit, so I figured that I'd fill one up and snap a few pictures for demonstration purposes. This also allowed me to calculate the total of each type of paint per shelf. So, without further adieu:
Vallejo:
Standing Up = 120
Flat Stacked = 360
Citadel/Lifecolor:
Single = 84
Stacked =168
NEW Citadel Bottles:
Single Only = 96
Mig Filter/AKI and other
Single Only = 78
Any other questions, just drop a comment or shoot me an email.

All Shelves: 3-4 Week Lead Time. Price $95.00 plus 18.00 insured shipping. I will combine shipping if applicable for an additional 6.00 per shelf.
Monday, April 4, 2011
Get TTG Bunker's Image Tag
Hello everyone, today I thought that I'd take the time to allow my fellow bloggers to add me to their blog via an Image Tag. Below, you will find the code required to display a backlink to my blog which can be copied and pasted into your blog widgets. Please let me know that you are doing this, and I will do the same for you! If you need help making an image tag, I will teach you how!
Let's all support each other to help benefit our community!
Let's all support each other to help benefit our community!
<a href=" http://ttgbunker.blogspot.com/"><img src="http://i19.photobucket.com/albums/b175/pearldrummer6969/TableTopLogoIcon.png" border="0" alt="TTG Bunker"></a>
Saturday, April 2, 2011
Model Paint Storage Shelf Vallejo, GW, Mig, Testors, Model Master

Constructed entirely of acrylic, these shelves can hold a TON (60 per shelf if stacked as seen below) of paint depending on which method you use, and have an acrylic back sturdy enough to hang on a wall. I am trying to gauge an interest level here to see I anyone out there in the modeling community could benefit from this type of paint storage, because to be honest, I need to have a lot of interest to keep my costs down.
If you are interested, please tell your friends and drop a comment in the box below so I can determine how many of the to begin mass producing.

Thursday, March 31, 2011
Scale Model Addict's BIG SPRING CONTEST
Starts April 1st and has some great prizes! Stay tuned for my entry unboxing TOMORROW! You don't wanna miss this!
Sunday, March 13, 2011
How To Make Asphalt Wargaming Bases
Ok everyone, here is my latest tutorial on how to make some realistic asphalt wargaming bases. Please subscribe to my new Youtube channel if you like! Any questions, feel free to drop me a comment.
~TTG Bunker
Wednesday, March 9, 2011
TTG Gets Youtube Account!
For all those asking for me to take videos of my tutorials, tonight might just be your lucky night. I have decided that I would have a go at countless hours of editing and retakes so that I can maintain a comprehensive tutorial library JUST FOR YOU! Take a peek at my trailer! Oh, and be sure to subscribe!
Sunday, February 27, 2011
TerraiNation V
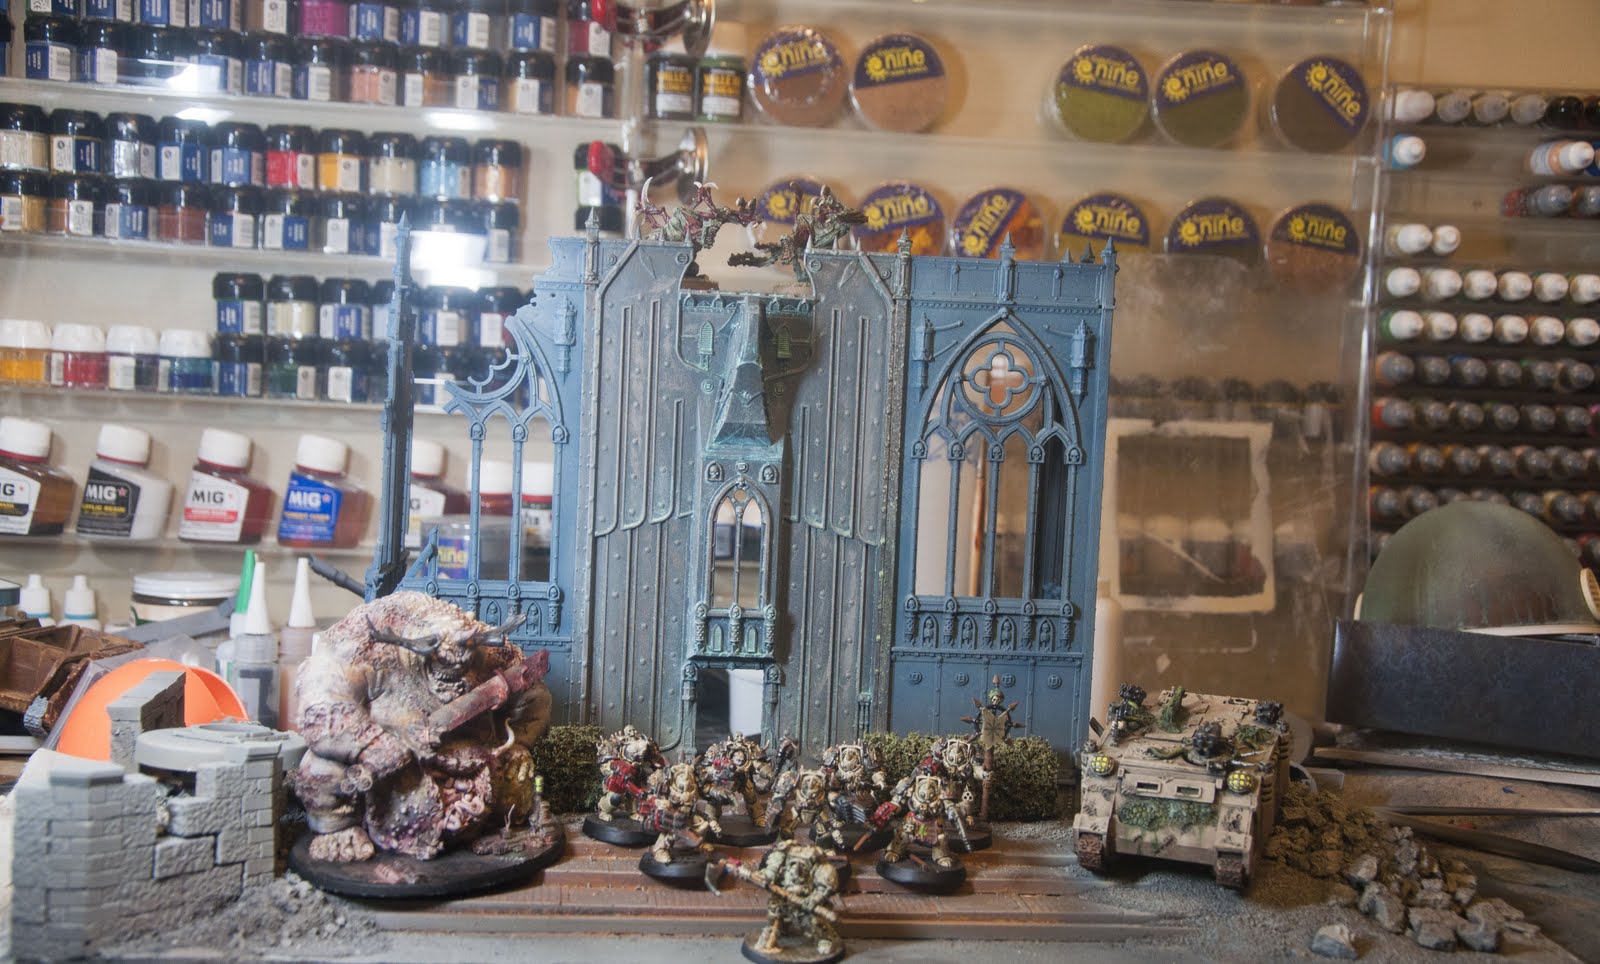
Welcome back to another installment of TerraiNation! This weekend was spent working some on the club gaming table terrain, and who better to share the progress with than you guys! These shots are still in the building phase, but they will soon be getting paint in March, so stay tuned for more updates on the biggest terrain project currently on the World Wide Web!
This part of the board will house a Cathedral, several blown up buildings a couple of strategically placed bunkers and some VERY unique weapons from our friends at Quantum Gothic. The cathedral will be heavily defensed with the two parapets seen in the pics.

 I wanted to showcase some of the tools that I use for all my terrain projects. Above, you will see all of the various tools that I use for the building process: Bar clamps, side cutters, sanding belts, Plastruct plastic welder and Testors glue. For the more major/custom work such as the first TerraiNation, I used a Dremel and miniature lathe and mill. I also occasionally use a laser cutter for completely custom jobs!

This part of the board will house a Cathedral, several blown up buildings a couple of strategically placed bunkers and some VERY unique weapons from our friends at Quantum Gothic. The cathedral will be heavily defensed with the two parapets seen in the pics.


Monday, February 21, 2011
Khorne Terminators and Abaddon
Hello all, a quick WIP for your scrutiny. I have been working on too many projects at once, which leaves too many in various stages. Have a look at what I have been working on. Enjoy!
WIP Khorne Terminators: Paint scheme VGC: 1) Dark Sepia 2) Gory Red 3) Bloody Red (highlight) Wash with Ogryn Flesh. Abaddon has some orange in the highlight.


 Abaddon nearing completion:

WIP Khorne Terminators: Paint scheme VGC: 1) Dark Sepia 2) Gory Red 3) Bloody Red (highlight) Wash with Ogryn Flesh. Abaddon has some orange in the highlight.


Monday, February 14, 2011
How To Cast In Resin Part II

Well, we're back with another installment of "How To Cast In Resin." Today I will be documenting the steps that I take to cast my resin pieces. Let's get started!
You will need everything mentioned in the previous post if you wish to follow along EXACTLY, but there are substitutions. A few items that i may have missed in the prior post are discussed below:
Surfactant- This stuff is used to keep the resin from sticking to the mold and causing damage over time. It allows your casts to slide right out of the molds. You can use a mix of Jet Dry dishwashing detergent and water, but I prefer to use this:

Step 1: Just soak while you are preparing the rest of the items that you will be using. Fill up a bucket of your Jet Dry mix as a first step so you can let them sit. When you are ready to grab your molds out, agitate them a bit with your hands as shown. Stick your fingers down into the recesses to get out any residual powder residue. Remember that your first cast will likely not be perfect but the subsequent casts following this will turn out nicely if all is done correctly. You can always use the first casts for rubble.

**Note that you do not want to pour the resin into a wet mold!


Step 5: Place the mixture into a vacuum chamber and turn on the pump. You want to get as close to 29 HG as possible, note that 30 HG is Full Vacuum. You will notice all of the air bubbles rising to the surface, and at 29 HG, the bubbles will begin to boil up and pop. Once this begins, you are okay to turn off the vacuum pump and SLOWLY let air back into the chamber. If you perform this step too quickly, you will have a huge mess to clean up.
***Remember the cure time of your resin here, taking too much time on this step will result in a block of resin in your cup. Do not throw this out though, because i can be used as a display base if you can put it on a lathe.

Step 6: I like to place my mold in the pressure pot and pour it in there. This keeps the mess isolated only to my pot. Do not pour the resin into a cavity, pour it onto the top of the mold near a corner of a cavity and let the resin roll into the mold. When you are finished pouring, put the lid on the pot and blast air into it. Keep the pressure below 60 PSI, as you do not want to damage your pot. Notice the closeup of my setup. There is a ball valve located just after the input to lock the pressure in. This is also used to let the pressure out.


Step 7: When the resin in your cup is nice and hard, remove the mold from your pot, and de-mold your pieces. If everything went well, you should be well on your way casting bubble free pieces. Good luck and if there are any questions, please ask them in the comments section.
~TTG~
Subscribe to:
Posts (Atom)